{
Adam Ard
}
README-Driven Design in Emacs
Write code and documentation entirely in org-mode
If you're a programmer, you're accustomed to putting README files at the root of your projects–usually in markdown. If you use an org file instead, you can take advantage of the great features emacs provides, including literate programming, which lets you generate your source and markdown documentation dynamically.
Let me walk you through one way this can be done. When you start a project, especially if you use something like github, you begin with an automatically generated README.md file. Delete that, and create a README.org file instead. Starting with an empty org file, you can begin recording important information about your project goals. You can add diagrams, code snippets, TODO items, time-tracking, and much more.
Here is how you might start, with a basic description:
* Demo

** Description

This project demonstrates how to use
[[https://en.wikipedia.org/wiki/Literate_programming][literate programming]]
inside of Emacs. Using this README.org as the source, you can generate markdown
documentation as well as source code. This strategy has several
advantages.

1. It keeps documentation and source code always in sync. Source code
   is never edited separately from the documentation. They are tightly
   coupled.

1. It allows you to present your code in a way that better suits human
   understanding. Source can be rearranged when it is generated to
   accommodate a compiler or interpreter.

1. It allows you to take advantage of all the other features of
   org-mode that naturally enhance your documentation (embedding
   diagrams, running code snippets inline, embedding TODO items,
   time-tracking, and much more)

1. Since Org-mode is very easy to customize, it allows you to further
   specialize your personal workflow.

1. It allows you to reuse code and reduce code duplication in ways
   that can be difficult directly in source code.
Org-mode lets you create lists, code sections, diagrams,
links, and much more– as good or better than
markdown. But when you use it with emacs, you can do a lot
more. For one, you can run code sections in place, and have
the results added back into your document. For example, you
can dynamically create diagrams using Graphvis from a text
description by creating a source block of
type dot. Typing C-c C-c anywhere
in the block will execute it, and create a png that displays
right below:
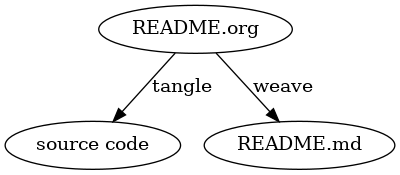
#+begin_src dot :file literate.png :exports both
digraph G {

  A -> B [label="tangle"];
  A -> C [label="weave"];

  A [label="README.org"];
    B [label="source code"];
    C [label="README.md"];
}
#+end_src
This works for dozens of languages. One org file can have source blocks for elisp, bash, c++, python, golang, etc. Each source block will format and highlight text according to the major mode that goes with that specific language. It is kind of magical.
Using your README.org file to capture all the information you collect is a powerful way to organize your work. You can keep this file under version control and share all your insights with everyone involved in the project. But most importantly, you can use literate programming.
The diagram generated above gives you a quick overview of what I mean by literate programming, and how I am using it. You can see that we start with a README.org file on top. At this point we can do one of two things -- tangle or weave.
Tangle is used to describe the process of generating source code. Weave is the process of generating documentation. These are terms that Donald Knuth used when he introduced literate programming in 1984.
That is really all there is to it. We are simply using a literate source file, in this case README.org, to generate the rest of our project files. The README.org is your source of truth. Your source files can be deleted and regenerated on the fly. In fact you don't even necessarily have to put them in git, unless you are working with someone that isn't using emacs as well.
Let's dig into the details of how this works, so you can see how cool this is. Now that we have a description, we can started coding. Maybe we'll just start with a hello world app, so we can make sure we have our environment set up correctly. Let's create a starting code block with a little documentation.
** Main

Below is the Hello World example:

file:main.go
#+begin_src go :tangle main.go :noweb no-export
package main

import (
    "fmt"
)

func main() {
    fmt.Println("Hello World")
}
#+end_src
This is a basic source block with a couple important
annotations. First is the :tangle property. Its
value is the location in the filesystem where the tangle step
will put this file. The second is the :noweb
property, where we specify that we don't want to tangle
files when we export documentation. This will make more
sense later. I like to put file:filename above
the block so that when we generate the documentation is it clear
where this file is going.
When you create a source block in org-mode, you can easily
pop into a language specific buffer by typing C-c
'.
Now that we have some code here, we are going to want to run it. Right now it just lives here in the README file. To get a copy in a separate file, you need to run tangle. Before I run a tangle operation, I am going to drop in the documentation for that step into the readme file.
Adding in documentation for each step you take is the essence of README-Driven Design. Now you don't have to leave org-mode to run the step because you can run it in place, and you don't have to try and remember what you did.
** Tangle

To tangle the current file (in other words, to generate the
source code), run the following elisp command:

#+begin_src elisp
(org-babel-tangle)
#+end_src

The keyboard shortcut for this command is ~C-c C-v t~. To tangle only
the file where the cursor is located use the prefix command ~C-u~. So
the full command would be ~C-u C-c C-v t~.

To tangle a file into another buffer and not to a file on disk, run
~C-c C-v C-v~ with your cursor on the section you would like to
tangle. This is a handy way to check how your file will be arranged.
When you run
C-c C-c inside the elisp source block, the
elisp function will be executed and a main.go file will be
generated in the current directory.
Now we need to build and run our file. But, don't go off to
the terminal! Document the step with more code snippets and
run it right here in org-mode (by running C-c
C-c in the code blocks). The results get dropped in
a result block just below the source block.
** Build instructions

The following command will build your project and deposit a executable file
called demo in the current directory.

#+begin_src bash
go build
#+end_src

#+RESULTS:

** Run

To run a built project, execute the following. After following the
steps outlined in "Build Instructions" above:

#+begin_src bash :results verbatim
./demo
#+end_src

#+RESULTS:
: Hello World
There's your Hello World results! Org-mode becomes your all-purpose terminal! The code and results and documentation are all there, right next to each other. Are you starting to see the power of literate programming? And we have only really scratched the surface. Let's look closer at what tangling can really do.
Lets use some literate programming syntax to templatize our
source file by modifying the Main section to look like
this.
** Main

Below is the framework for the main file

file:main.go
#+begin_src go :tangle main.go :noweb no-export
package main

import (
    <<imports>>
)

<<functions>>

func main() {
    <<main>>
}
#+end_src
Now what we have looks more like pseudocode--it represents a kind of scaffolding. It shows what the overall layout of the file and leaves slots where the tangle command can inject code.
Lets create a section called Say Hello.
** Say Hello

Say Hello needs to import fmt to be able to print to stdout.

imports+=
#+begin_src go :noweb no-export :noweb-ref imports
"fmt"
#+end_src

SayHello, says hello to you.

functions+=
#+begin_src go :noweb no-export :noweb-ref functions
func SayHello() {
    fmt.Println("Hello There")
}
#+end_src

We need to invoke the function in the main sections

main+=
#+begin_src go :noweb no-export :noweb-ref main
SayHello()
#+end_src
The three new code block here are similar to the main file
section above. The only difference is that they have a
noweb-ref property instead of a :tangle filename
property.
The function+= and imports+= above
the code blocks is just extra documentation that I like to
add to make it a little clearer what section you are appending to.
Type C-c C-v C-v in the main code block to see
a preview of what the tangled file will look like. It should
look like the following. Notice that the slots in the
template we created above are now filled in.
package main

import (
    "fmt"
)

func SayHello() {
    fmt.Println("SayHello()")
}

func main() {
    SayHello()
}
The tangle step puts the code section together the way they need to go to run properly. Literate programming lets you delay putting the code together so you can document things in the way that makes the most sense.
Now that you have created the code, you just need to generate the documentation. Let's add the documentation for that step to our literate file as well. We are going to run an export to a markdown file. You have a lot of options of what file types to export to (ie. pdf, markdown, html)
** Weave

To weave the current file (in other words, to generate documentation), run
the following command:

#+begin_src elisp
(org-gfm-export-to-markdown)
#+end_src

#+RESULTS:
: README.md
After you run this step, you have a nicely formatted markdown file with all your documentation, like the one below. If you are working with people that don't use emacs, you can add it to github, so they can benefit as well.
# Demo
## Description
This project demonstrates how to use [literate programming](https://en.wikipedia.org/wiki/Literate_programming) inside of Emacs. Using this README.org as the source, you can generate markdown documentation as well as source code. This strategy has several advantages.
1. It keeps documentation and source code always in sync. Source code is never edited separately from the documentation. They are tightly coupled.
2. It allows you to present your code in a way that better suits human understanding. Source can be rearranged when it is generated to accommodate a compiler or interpreter.
3. It allows you to take advantage of all the other features of org-mode that naturally enhance your documentation (embedding diagrams, running code snippets inline, embedding TODO items, time-tracking, and much more)
4. Since Org-mode is very easy to customize, it allows you to further specialize your personal workflow.
5. It allows you to reuse code and reduce code duplication in ways that can be difficult directly in source code.
```dot
digraph G {
A -> B [label="tangle"];
A -> C [label="weave"];
A [label="README.org"];
B [label="source code"];
C [label="README.md"];
}
```

## Main
Below is the framework for the main file
```go
package main
import (
<<imports>>
)
<<functions>>
func main() {
<<main>>
}
```
## Tangle
To tangle the current file (in other words, to generate the source code), run the following elisp command:
```elisp
(org-babel-tangle)
```
The keyboard shortcut for this command is `C-c C-v t`. To tangle only the file where the cursor is located use the prefix command `C-u`. So the full command would be `C-u C-c C-v t`.
To tangle a file into another buffer and not to a file on disk, run `C-c C-v C-v` with your cursor on the section you would like to tangle. This is a handy way to check how your file will be arranged.
## Build instructions
The following command will build your project and deposit a executable file called demo in the current directory.
```bash
go build
```
## Run
To run a built project, execute the following. After following the steps outlined in "Build Instructions" above:
```bash
./demo
```
## Say Hello
Say Hello needs to import fmt to be able to print to stdout.
imports+=
```go
"fmt"
```
SayHello, says hello to you.
functions+=
```go
func SayHello() {
fmt.Println("Hello There")
}
```
We need to invoke the function in the main sections
main+=
```go
SayHello()
```
## Weave
To weave the current file (in other words, to generate documentation), run the following command:
```elisp
(org-gfm-export-to-markdown)
```
Conclusion
Everything you need to understand, setup and run your project is here in your README.org file. You can come back to it months/years later and pick up where you left off. Literate programming is a fun and powerful way to program, and a README.org file is the perfect place to do it.
See: literate-demo for a more advanced literate example that you can use as a template for your own projects. Also, to see a static site template written completely with literate programming: static-website-literate-demo.Happy literate programming!